5 Best Free CDN Plugins For WordPress & How To Set It Up
Improving your website loading speed takes a very important role in ranking your website on Google. And one of the best ways to supercharge your website is to use a CDN.
In this guide, we explain what a CDN is, why you should use one, and show you how to set up a CDN in WordPress for free.
Even though it may sound like a very advanced process, installing a CDN is quite easy. Thanks to WordPress CDN plugins, you can get it done in just a few steps.
We’ll walk you through the process. First, let’s see what these CDNs are really about.
What is a CDN?
A CDN, or Content Delivery Network, is a system that allows you to store the core resources of your website on the cloud to serve them to your visitors much faster.
When using a CDN, the images, code scripts, and the main elements of your website get stored on a network of servers provided by the CDN. Whenever a user visits your website, the CDN serves your site content to the visitor using the nearest server.
For example, CDNs have servers located around the world. So if a user from Australia visits your website, the CDN will use the nearest server to that location to serve your website content to that user.
As you can imagine, it reduces the time it takes to connect a user to your website, resulting in faster page load times.
Why Use a CDN?
If you want your website, articles, and pages to rank higher in Google search results, you should do everything you can to improve the loading speed of your website.
Google has been using the page loading speed of websites as a ranking factor for many years. Recently, Google introduced Core Web Vitals, a new set of guidelines for optimizing websites for better SEO (search engine optimization).
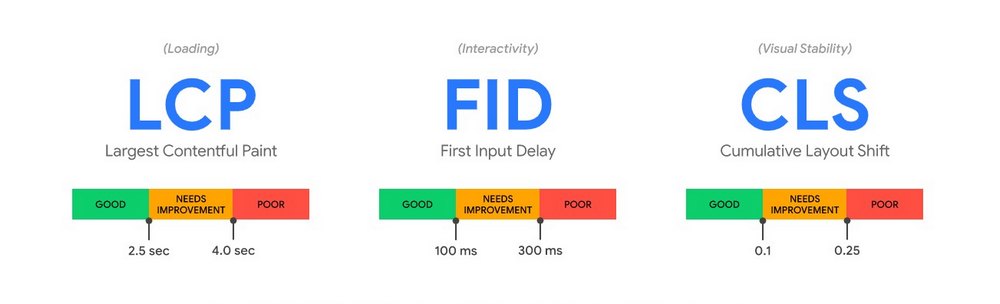
The first and the main aspect of the Core Web Vitals is “loading”. The time it takes to load a page on your website will determine how Google ranks pages on search results pages. Your website should load in under 2.5 seconds to improve the chances of getting better rankings on Google.
Using a CDN goes a long way to help boost your website loading speed. Since it delivers your website content based on the visitor’s geo-location, your websites will load much faster with minimum delays.
Top Free WordPress CDN Plugins
There are several platforms and services you can use to setup a CDN. Most of them are paid services. In this guide, we mainly focus on the free services.
These are some of the best free WordPress CDN plugins you can use to easily setup a CDN in your website.
1. Cloudflare
Cloudflare is arguably the most popular CDN on the Internet. Even some of the biggest brands and more than 25 million websites use the service. It’s also used by over 200k WordPress websites.
Cloudflare comes with a generous free plan that offers a free global CDN with servers located in multiple regions, protection from DDoS attacks, automatic cache purging on WordPress, and much more.
Best of all, Cloudflare WordPress plugin is beginner-friendly and very easy to setup.
2. Shift8 CDN
Shift8 CDN is a completely free CDN service provided by a Canadian company. Considering how great of a service it offers, it’s hard to believe that it’s free to use.
Shift8 offers coverage in several regions in the world, including the US, Canada, Asia Pacific, and Europe. Even though the service is provided by a small company, they are constantly improving the service with new endpoints.
This CDN is most suitable for smaller websites and blogs that don’t get heavy traffic spikes.
3. PageCDN
PageCDN is another popular CDN service that promises to speed up your website by 10X. PageCDN offers a public CDN, which you can use free of charge. It also provides many open-source resources and CDN libraries for free, like jQuery CDN, Bootstrap CDN, Easy Fonts CDN, and more for delivering content much faster.
According to the company, many websites use the same resources from the CDN and it allows browsers to share cache between sites. This helps speed up loading times for websites even further.
4. CDN Enabler
CDN Enabler is a free plugin offered by KeyCDN, another popular CDN service. KeyCDN is a premium service with affordable pricing plans starting at $0.04 per GB per month. But, you can use the plugin without a KeyCDN account.
You can easily use the CDN Enabler plugin to connect with a free CDN like AnyoneCDN to install a CDN in WordPress.
This plugin is most suitable for advanced users as it involves a slightly more complicated setup process.
5. Jetpack
Jetpack is well-known as the all-in-one solution for WordPress security, backup, and maintenance. This plugin also comes with a free CDN that automatically optimizes the images on your website.
Images take up the most resources on any website. Jetpack’s CDN optimizes your images and delivers them via its servers located around the world. This will drastically improve the load times of your website.
How to Add a CDN in WordPress
Installing a CDN in WordPress is simple. We’ll show you how it works using the Cloudflare plugin. But feel free to use any plugin that you wish to use. The process will be similar with most CDN plugins.
As always, we recommend that you take caution and backup your website before installing any plugins or systems on your website.
Step 1: Create a Cloudflare Account
In order to use the Cloudflare CDN, you’ll need a Cloudflare account. Don’t worry, it’s free to sign up.
Head over to the Cloudflare website and signup for a free account.
Step 2: Add Your Website in Cloudflare
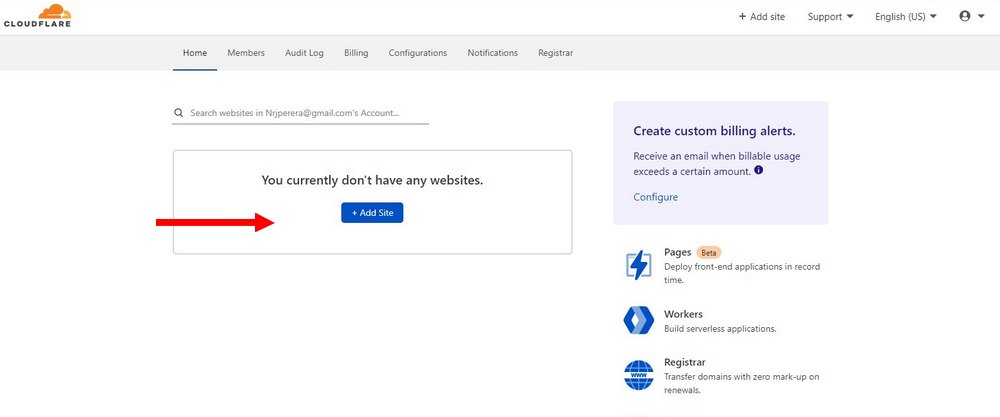
After signing up for a new account, you can add your website to Cloudflare.
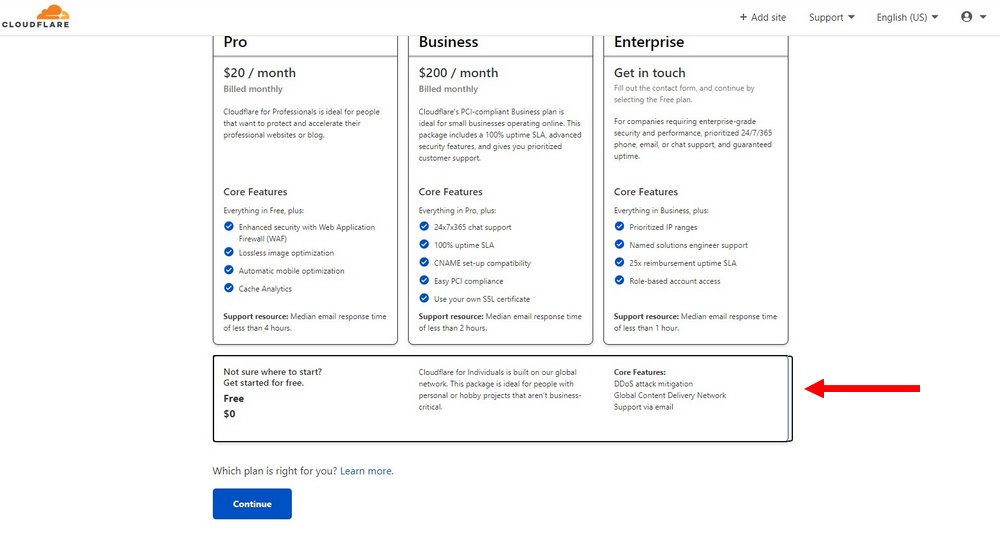
Simply enter the URL of your website. And then select the Free plan to continue.
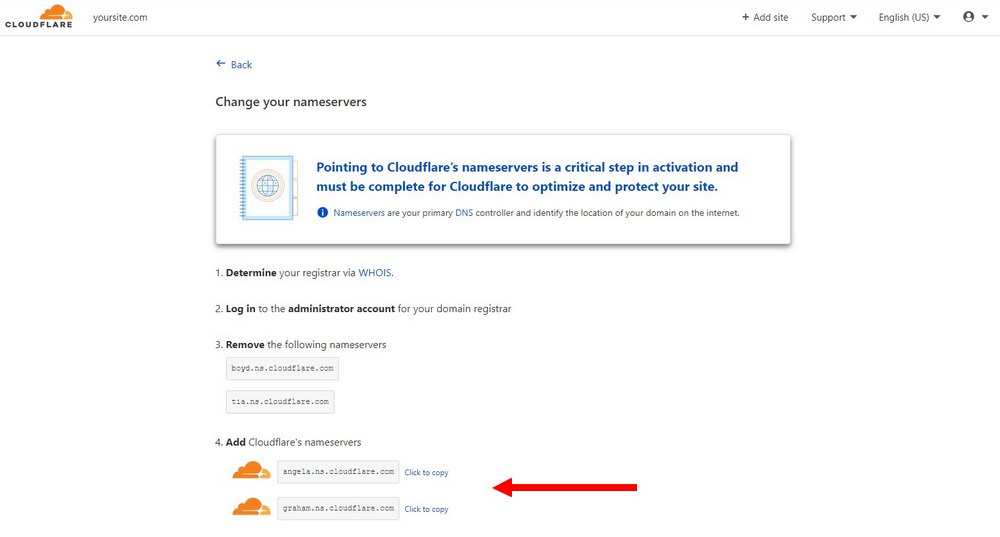
Cloudflare will now prompt you to check for DNS, you can skip this step. Then you will be prompted to change your nameservers to Cloudflare nameservers. This is important for fully optimizing your website.
Copy the nameservers provided by Cloudflare, login to your domain name registrar and change the default nameservers with the ones from Cloudflare. It will take a few moments for the changes to take effect.
Step 3: Create an API Token
After adding your website to Cloudflare, go to your Cloudflare profile by clicking on the profile icon on the top-left corner.
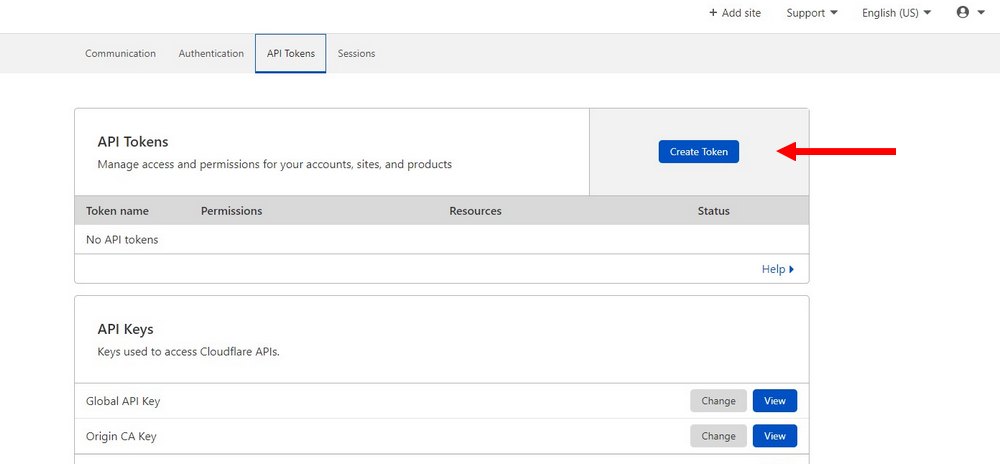
Switch over to the API Tokens page and create an API Token.
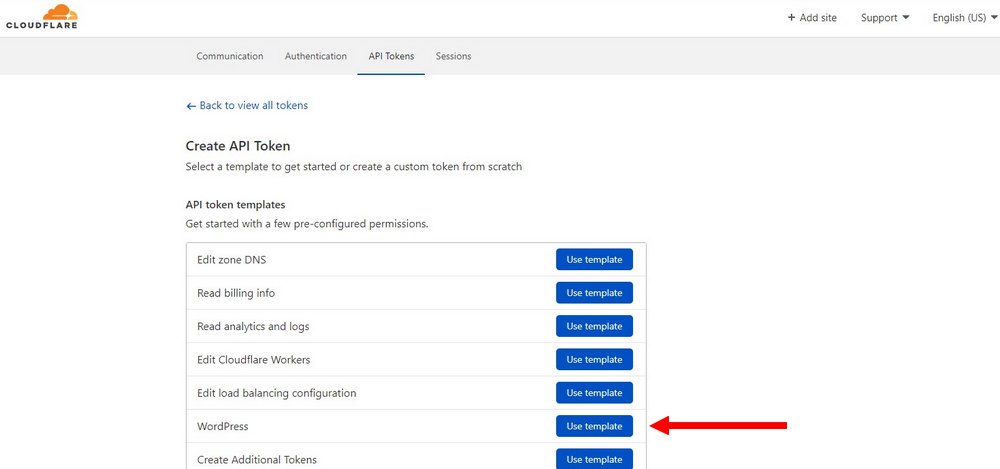
Select WordPress Template to create the key.
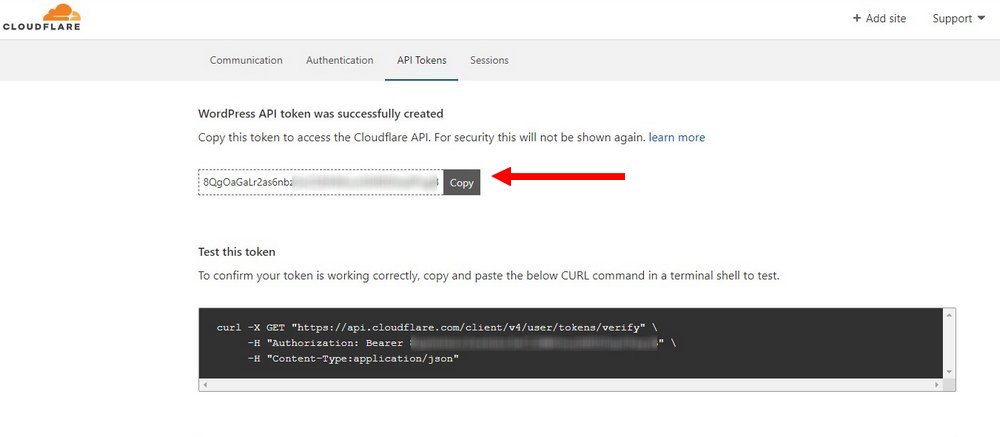
Once done, copy the API Key.
Step 4: Install the Cloudflare Plugin
Now login to your WordPress dashboard and go to Plugins >> Add New.
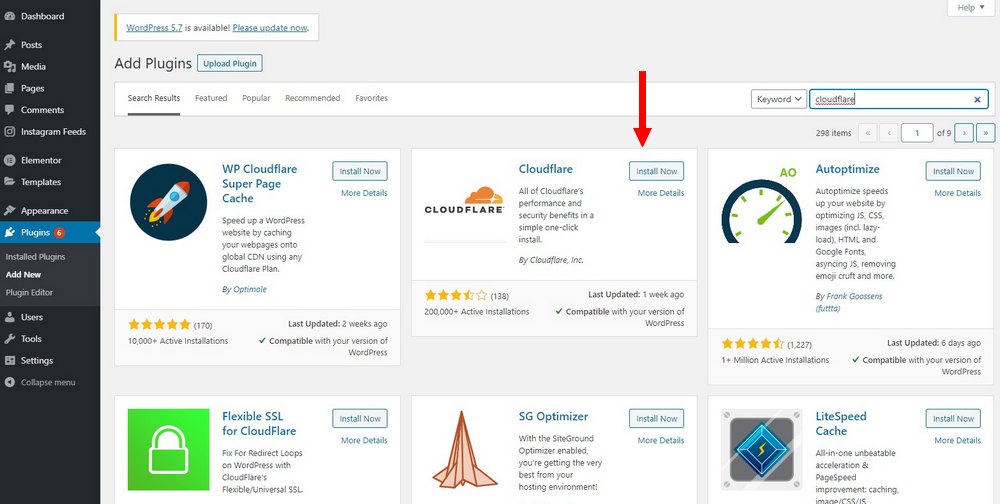
Search for the Cloudflare plugin. Install and Activate the plugin.
Step 5: Configure the Cloudflare Plugin
After installing the plugin, go to Settings >> Cloudflare page.
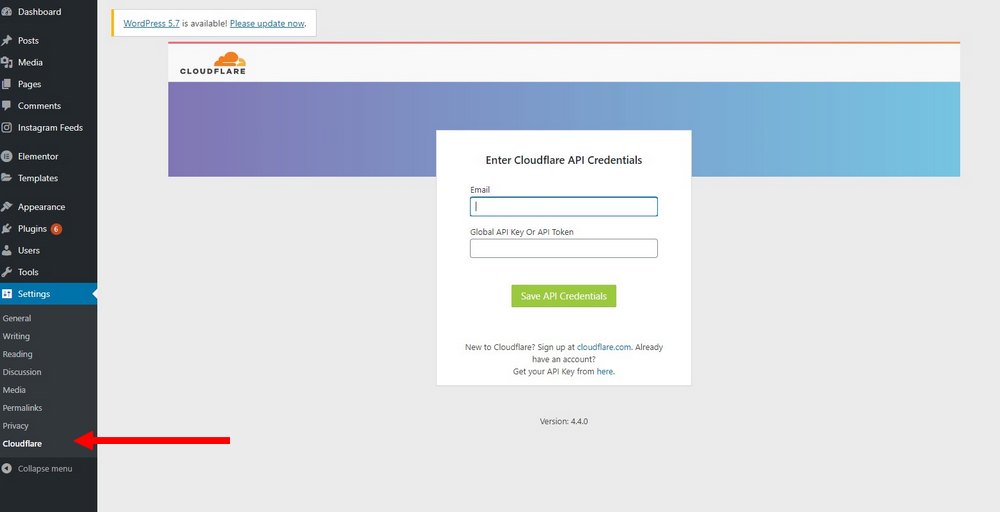
Sign in to your Cloudflare account by entering your email and the API Key you’ve just created. And click on the Save API Credentials button.
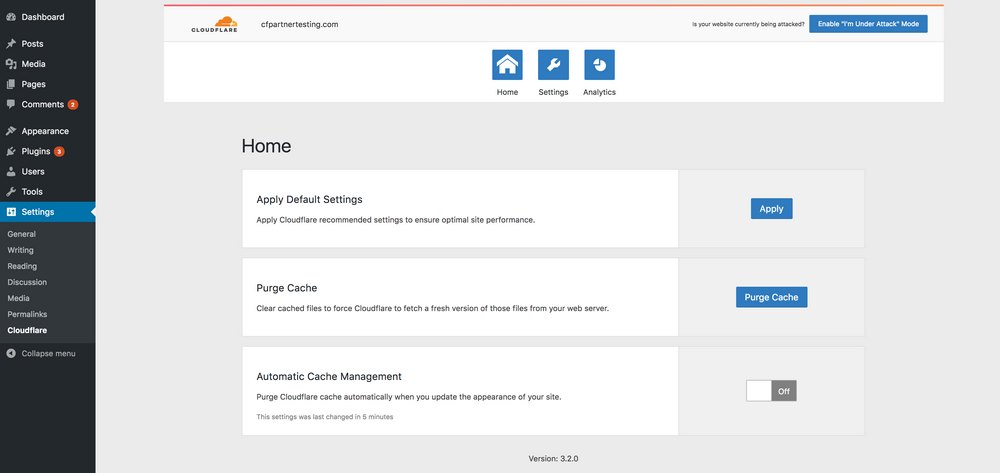
That’s it. Now you can configure the settings of the plugin. If you’ve followed all the steps, your CDN should be up and running by now.
Which CDN Should You Use?
Cloudflare is the obvious choice when it comes to free CDNs. It’s reliable, offers a good free plan, and it’s trusted by even the biggest brands.
However, if you can afford a premium service, use the premium plan offered by PageCDN with private CDNs. It’s optimized for WordPress websites.
Also, be sure to read out best WordPress caching plugins guide to find the right caching plugin for your website.
Looking for WordPress hosting? We use Kinsta. They offer world-class WordPress hosting, built to keep your website fast, secure, and always online.